Using Avisynth with LiMovie
Introduction
With Avisynth (www.avisynth.org),
LiMovie can read a much larger set of AVI files. Before discovering
Avisynth I used VirtualDub to convert my DV based AVI files into uncompressed
AVI and then opened the uncompressed AVI file with LiMovie. This step was necessary because I do not have a DV codec that works
with the Video for Windows API and LiMovie can only read AVI files via the Video
for Windows interface. With Avisynth installed I can now skip this step
and work directly with the DV based AVI files. With this new approach I can now
examine much longer time spans with LiMovie (useful for lunar occulations) and
it saves the time (and space) consuming step of generating an uncompressed
version of the AVI file. This web page provides a brief tutorial on using
Avisynth with LiMovie and includes some notes on some of the esoteric features.
To use Avisynth: install it, create a text "script file" with the extension .avs, and open this script file with LiMovie (or VirtualDub).. The script file is a simple text file that includes commands telling Avisynth which AVI file to read, how to read it, and optionally provides for some filtering or enhancements. To utilize Avisynth with LiMovie you open the *.avs script file with LiMovie (instead of opening the AVI file itself). When LiMovie opens the *.avs file, Avisynth reads the specified AVI file, interprets the file data with the appropriate codec, and sends the data to LiMovie. Why do this? Because Avisynth can utilize the DirectShow video subsystem and thereby read just about any AVI compression. Unlike LiMovie, Avisynth is not limited to the Video For Windows codecs installed on your machine - it can utilized any codec. In addition Avisynth includes several useful image enhancement filters, and there are many additional plug-ins provided by Avisynth users for reading difficult or unusual video formats.
For example, let's say you would like to review the DV based video file "c:\videodata\occultation.avi" with LiMovie. Create a text file (with Notepad) called occultation.avs (could be any name with an .avs extension) and enter the following line in this file.
DirectShowSource("c:\videodata\occultation.avi")
Then start LiMovie and open occultation.avs. Upon opening occultation.avs, Avisynth will interpret the DV data (using the MS default DV codec for DirectShow) and feed it to LiMovie.
Note:
In my current
version of LiMovie the file open dialog will only browse for *.avi files (not *.avs
or *.* files), but I can type in the filename directly - occultation.avs and it
works.
Actually Avisynth has more options than DirectShow for reading
AVI files (e.g. AVISource, OpenDMLSource, ...). I used DirectShow because my DV files are type-1 and only DirectShow would
read those. You may want to review the Avisynth documentation to determine
which function is most appropriate for your situation.
There are many sources of information on Avisynth on the net. As of this writing the avisynth website has been unavailable for several days, so I have posted a recent version of Avisynth (version 2.57) on my site: Avisynth self-extracting archive (*.exe file). To install Avisynth, download this file and run it. It will install Avisynth and create a program group in your start menu (including a link to some documentation).
Levels Filter - Basic Image enhancement
Avisynth includes a built in filter called "levels" that is analogous
to the levels command in many image manipulation programs (including VirtualDub
and Photoshop). I find that this filter is often useful when viewing
videos containing dim stars. In these videos I use the level command to
stretch out the contrast for the darker parts of the image by lowering the top
end of the input range and often adjusting the "gamma" or mid-tone adjustment as
well. AviSynth is not well suited to previewing these adjustments because
you must iteratively change the script file then re-open script file to view the
changes. Instead I open the video file with VirtualDub, add the levels
filter and use the preview mode of this filter to determine the best settings.
Then I input these settings into the Avisynth levels command in the *.avs script
file. Here is an example of a script that makes a dim star more visible.
DirectShowSource("c:\videodata\occultation.avi")
Levels(0,0.7,50,0,255,coring=false)
Note: the coring argument is related to the issue of the "color space" of the data in the AVI file. More specifically, this relates to the range of luminosity and chroma values for the pixels in a frame. Video destined for TVs should meet the CCIR-601 criteria for digital video and this limits the numerical values for black to a luma value of 16 and white to a luma value of 235. However, there are situations where a file may contain values outside these ranges. For example, I have found that the DV files that I download from my Sony camera contain pixels with values outside the "standard" range. I don't know if it is the camera or the capture software but it is there. If you do not specify "coring=false" in the levels command, the Avisynth Levels function will rudely clip all values less than 16 to 16 and all values greater than 235 to 235. In most situations this is not a problem because even dim stars seem to be above 16 and it is rare that we would want to recover data from the "super-white" range of 235 to 255. However, I recommend using coring= false as a default. If you wish to later adjust your image to get rid of any 'super-black' and/or 'super-white' values, use the command "ColorYUV(levels="pc->tv"). This command will do a more intelligent job of mapping the colors from the 0,255 range into the 16,235 range (better than a simple clipping approach). For more information see the comments in the Avisynth documentation and this description of "The White-clip problem".
Running Average Script
As an exercise and a demonstration of the flexibility of Avisynth I
created a script that adds together frames in a video as a running average.
The purpose of this filter is to increase the signal to noise of very dim stars
to make them more "visible" to LiMovie (and the eye). Of course, this
approach reduces the time resolution of the video but it may be the only option
with the star is dim. This script is not "smart" enough to track the
motion of a star. If the star is moving around in the span of the frames
averaged the star will be "blurred" across the image. This script allows
for a "box" of the image to contain a timestamp (e.g. Kiwi OSD time insertion).
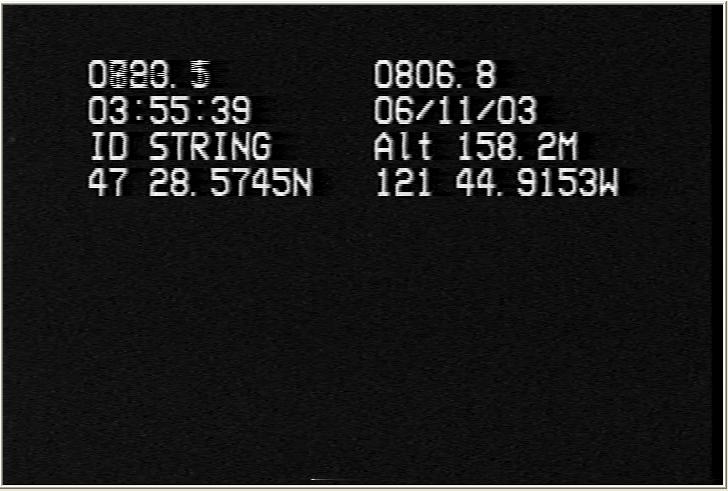
As an example, here is screen capture from VirtualDub of the AVI file for an asteroid occultation with NO modifications:
And here is a screen capture after using the script AddThree to add three frames together.
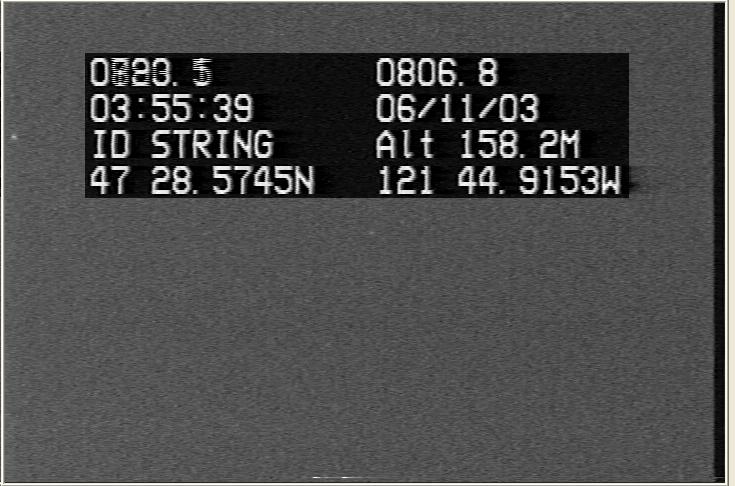
Although the time resolution is now down to 3 * 1/30 second = 1/10 second you can actually see some stars. By adding a Levels filter you can make these stars even more apparent. This is quite an improvement.
Here is the script that I used. Note that I have defined two script functions: AddThree and AddFive at the beginning of the script. At the end of the script the AVI is opened and the AddThree function is called.
<begin script file AddFrames.avs >
#
# AddThree - produces a three frame running average version of the input AVI (to
reduce noise)
#
# This function adds (not averaged) together the frames of a clip as a running
average (three frames at a time).
# The frames are added, not averaged so this function will "blow out" any bright
values. The middle frame of the three
# is assumed to be the "time frame" and the time label for this frame is
overlayed on the final "summed" frame. The
# location of the time label in the frame is specified via the X1,Y1,X2,Y2
coordinates which are analagous to the
# left, top, width/-right, height/-bottom coordinates specified for the Avisynth
built-in function "Crop".
#
#
# Inputs:
# c = the input clip
# X1,Y1 = x,y coordinates of the upper left of the time label
# X2,Y2 = either width,height or -right,-bottom coordinates for the time label
#
#
#
#
Function AddThree ( clip c , int X1, int Y1, int X2, int Y2) {
intFrames = Framecount(c)
clipL1=Trim(c, 0,intFrames-3)
ClipM=Trim(c, 1,intFrames-2)
ClipR1=Trim(c, 2,intFrames-1)
ClipLabel=Crop(c, X1,Y1,X2,Y2)
Overlay(ClipL1,ClipR1, x=0, y=0, mode="add", opacity=1.0)
Overlay(ClipM,x=0,y=0,mode="add",opacity=1.0)
Overlay(ClipLabel,x=X1,y=Y1,mode="blend",opacity=1.0)
return (Trim(0,intFrames-1))
}
#
# AddFive - produces a Five frame running average version of the input AVI (to
reduce noise)
#
# This function adds together the frames of a clip as a running average (five
frames at a time).
# The frames are added, not averaged so this function will "blow out" any bright
values. The middle frame of the five
# is assumed to be the "time frame" and the time label for this frame is
overlayed on the final "summed" frame. The
# location of the time label in the frame is specified via the X1,Y1,X2,Y2
coordinates which are analagous to the
# left, top, width/-right, height/-bottom coordinates specified for the Avisynth
built-in function "Crop".
#
#
# Inputs:
# c = the input clip
# X1,Y1 = x,y coordinates of the upper left of the time label
# X2,Y2 = either width,height or -right,-bottom coordinates for the time label
#
# Example:
# DirectShowSource("C:\Documents and Settings\Steve\My Documents\Ulead
VideoStudio\Occultations\Archive\dimtest.avi")
# AddThree(Last,80,50,-96,-285)
#
#
#
Function AddFive ( clip c , int X1, int Y1, int X2, int Y2) {
intFrames = Framecount(c)
ClipL2=Trim(c, 0,intFrames-5)
ClipL1=Trim(c, 1,intFrames-4)
ClipM=Trim(c, 2,intFrames-3)
ClipR1=Trim(c, 3,intFrames-2)
ClipR2=Trim(c, 4, intFrames-1)
ClipLabel=Crop(c, X1,Y1,X2,Y2)
Overlay(ClipL2,ClipL1, x=0, y=0, mode="add", opacity=1.0)
Overlay(ClipM, x=0, y=0, mode="add", opacity=1.0)
Overlay(ClipR1,x=0, y=0, mode="add", opacity=1.0)
Overlay(ClipR2,x=0, y=0, mode="add", opacity=1.0)
Overlay(ClipLabel,x=X1,y=Y1,mode="blend",opacity=1.0)
return (Trim(0,intFrames-4))
}
#
# Now open the AVI file and call the averaging function
#
DirectShowSource("C:\videotest\dimtest.avi")
AddThree(Last,80,50,-96,-285)
<end of script file>
Links:
Steve
2006-Oct-19